Showing posts with label diy. Show all posts

Monday, 10 February 2014

Cut Out and Keep: 'I beat for you.' Valentines Card


It's Valentines Day in a few days, so we've put together this 'I beat for you.' Valentines card, that you can print out and send to your loved one. Whether that's your best friend, partner or favourite pet, tell them you love them, Cosmos and Crayons style!

All you'll need is:
  • A piece of card
  • A piece of paper
  • scissors
  • glue

    Click both image, then right click and save to your computer. Print out the card on the piece of card, and the envelope on the piece of paper.

    Envelope

    Card
    Don't forget to pop by later this week for more science facts!

Wednesday, 18 December 2013

Cut Out and Keep: Christmas Card

It's another cut out and keep Christmas post!
This week we bring you a Cosmos and Crayons Ginge and Sloth Christmas card and envelope.

Merry Christmas from Sloth and Ginge.
Simply download the three printouts below. You will need two sheets of card, scissors and glue to make 2 cards with envelopes.

Print this one first, full size A4 portrait.

Pop your card back in your printer,
 with the previous printout on the reverse
 and the blank side facing up.
 You the should have two cards, with a front and inside printed. Chop these out with your scissors following the faint grey line horizontally across the page.
Printout two envelopes, full size A4 landscape.
Cut out your envelope prints, fold and glue the tabs in place, and voila!


Sunday, 8 December 2013

Cut Out and Keep: Anatomy Snow Globes


We have a Christmas special Cut Out and Keep project for you to create!

Once a week up until Christmas we will be doing a Cut Out and Keep Christmas themed project, to help you have a Cosmos and Crayons themed festive time.

This week, it's anatomy themed snow globe decorations!


Simply download the two sheets below, and print onto a piece of card (full size A4) turning the sheet over and printing the back on to the reverse. Then hole punch the top, attach a piece of sting and pop on your tree. You could hang them anywhere.

Click the image, then right click and save to your computer :)
And the same again.

If you have any photos of your creation, email them to chopstitchcrafts@gmail.com to be featured on the blog :)

Thursday, 31 October 2013

Happy Halloween! Last Minute DIY Costume Ideas.

♥ Happy Halloween ♥

It's that time of year where all things spooky come out at night!
We love Halloween, or any excuse to dress up, but organising a costume can be hard work.
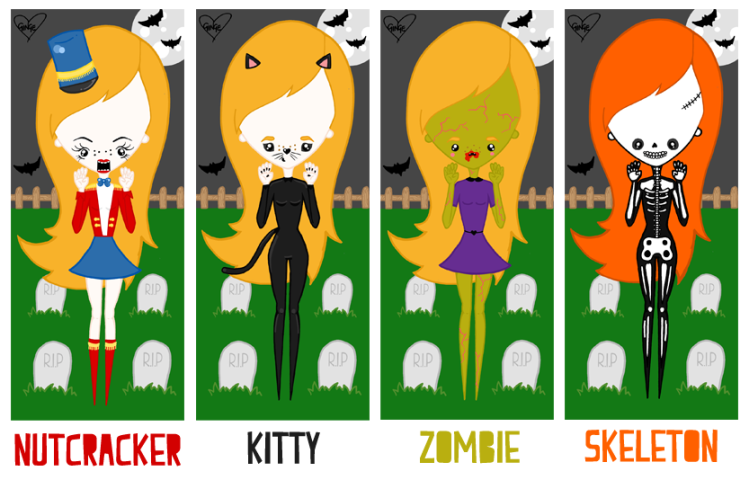
We have put together four easy to do costumes / facepaint ideas for any last minute costumers.


My favourite costume is the Nutcracker, that's what I'll be dressing up as. I'll add some photos of the finished outfit!
Creeepy!

♥ Start by painting your face white with the facepaint and line your eyes with the white eyeliner.
♥ Stick some eyelashes on your top and bottom  lashes.
♥Colour your top lip with red lipstick
♥ Draw some teeth on your bottom lip.
♥ Colour your chin in black. Leaving space at the bottom of your chin to draw another set of teeth and a bottom lip, to give the illusion of a Nutcracker's chops.

Your outfit doesn't need to be fancy. Try stick to blue and red. A red top and blue pants or skirt, stick some gold tassels on if you can find some. Pop a bow tie on too.

Meooow!

♥ Colour your eyelids in with the grey eyeshadow, line them with the black eyeliner. Optionally pop some false lashes on your top eyelid.
♥ Draw a little heart shape on the tip of your nose and some whiskers on your cheeks.
♥ Pop on some spooky black lipstick.
♥ Colour your nails in with the black nail varnish.

For the outfit, you could make a set of ears out of fake fur or felt, and stick them to a headband. Uses left over material to make a tail and stick it to your pants. Wear black leggings and a black top to finish your Kitty outfit.

Brainsssss!

♥ Colour your entire face with green facepaint (and your limbs if you're daring enough)
♥ Use the red lip liner to draw some veins on.
♥ Use the red lipstick to colour some 'blood' around your chops, to make it look like you've been munching on the living.

Since zombies are just people that have magically come back from the dead, you can wear anything.
Super handy for a last minute costume.

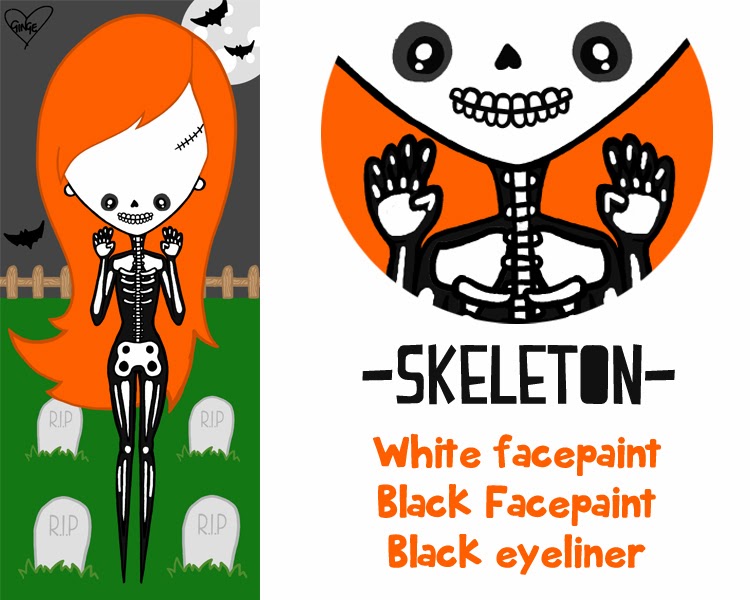
Bones, Bones, Bones.
♥ Colour your face in with white facepaint. (Including your lips.)
♥ Colour your eye sockets in with black facepaint, and draw an upside down heart for your nose socket.
♥ Draw on some teeth on your lips that extend across your cheeks.
♥ If you're a clumsy clops, draw a few cracks on your forehead.

You could go all out and buy a long black t-shirt and black leggings and draw some bones on them. Or wear regular clothes and draw some bones on your hands.

VoilĂ !
Hope these are helpful. What are you upto this Halloween?


If you're staying in this Halloween, we recommend watching Braindead, Toxic Avenger or Night of the Living Dead, they will sure give you plenty of scares!

Friday, 11 October 2013

Cut Out and Keep: Icosahedron Sun, Earth and Moon Mobile


It's the first Cut Out and Keep project! How cute is this Icosahedron Earth, Sun and Moon mobile! We love making stuff in the lab, so our new regular post 'Cut Out and Keep' will be different projects for you to print out and create.
An Icosahedron is a 20 sided 3 dimensional shape. Wowza.  


Instructions:
Including printing, allow yourself an hour for this project. I rate this as 3.5 tricky sticky sausages out of 5. Anyone can make it, but some of the gluing is abit tricky, so you will need a little patience.
You will need the following images. These files are saved as PNG files, alternatively comment with your email address and I can send you a PDF containing the files :)

Click the image, then right click and save
to your desktop for printing...

... and again...

... and one more time.

You will need
♥ Three sheets of A4 paper/ card ( To print out the Icosahedrons)
♥ Scissors
♥ Glue
♥ Ruler
♥ A piece of string/ wool. A length of 20"/ 50cm will be plenty.

Not got a printer? Email me at chopstitchcrafts@gmail.com with a postal address and I will send you out the images and a piece of string.


I use this handy dinosaur book as a cutting/gluing matt :)

First you want to print out all three Icosahedrons, full size A4 landscape, then chop them out with the scissors.

You only want to score/bend tab number 11 on all three Icosahedrons.
The tabs are numbered in order of gluing (Number are not shown on the images as I added these later)
 Start by adding a generous amount of glue to tab number one. Stick this tab to the tabless side across from tab number one. The image above shows how to do this. Continue gluing along until tab number 5.
 Your Sun should look like the first image. get your piece of string, leave enough length for hanging, then add a knot, slip this knot under the center of the Icosahedron, leaving it trailing underneath then glue tab 5 to the tabless side across, this last tab will pull the icosahedron into shape (as shown in the middle image). Turn the shape onto its side and glue tab 6 to the tabless side across.
 Turn the sun upside down, and continue gluing tabs, in numerical order from 7-10.
You will have tab number 11 remaining. pull the string up through the center, then glue tab 11 in place. This tab is quite tricky, this is why scoring this tab earlier came in hand, if its too tricky to glue, tuck it in so no one can see it. 
 Now start gluing the tabs on Earth until you get to number 5. Pop a Knot in the string as far down as you want the Earth to hang from the sun. then glue tab 5.
 Continue doing the same as you did for the sun, making sure you pull the string through the bottom center.
Follow the above instructions again for adding the Moon.

Only this time, when you get to gluing tab number 11, trim and took the remaining string inside the Moon.
Then pat yourself on the back for all your hard work.
Hope you enjoyed this Cut Out and Keep Project.

Send me a photo of your mobile to chopstitchcrafts@gmail.com, and I'll pop it on the blog :)

Monday, 9 September 2013

Scouting for Ad Buddies

Help spread the word!
Cosmos and Crayons are on the lookout for fellow bloggers to swap ads with.
We are still fairly new to blogging, and still getting our heads around all the jargon, so we are offering two sizes to choose from free for a month, ideally if you can offer an add in similar size on your blog.

Currently we are taking ads in the following sizes.

250x150 Pixels


Image URL from my Photobucket account:
 http://i878.photobucket.com/albums/ab343/chopstitch/cosmosandcrayons250x150_zpsd396cc3a.jpg


250x100 Pixels
Image URL from my Photobucket account:
http://i878.photobucket.com/albums/ab343/chopstitch/cosmosandcrayons250x100_zps8ecb5ba4.jpg

If you need the Cosmos and Crayons ad in a different size to fit on your blog, let me know and I will make one up for you. 
So, if fancy an ad swap, pop me an email at chopstitchcrafts@gmail.com

Friday, 26 July 2013

D.I.Y: Adventure Time BMO Nails

So this is the first DIY post, hope you enjoy it.
Everyone loves the super adorable BMO from Adventure Time, so why not follow this tutorial to give yourself some cute BMO nails.
All you need is:

  • Clear nail varnish
  • Sharpie marker pen
  • 4 colours (shown below)


Before you start, give your hands a pamper. Soak in warm soapy water, trim and file your nails, and apply a handcream. Its also best to apply a base coat (clear nail varnish) first, as it prevents staining on your nails.

I hope you enjoyed this tutorial.